Creating a well composed, colour corrected, and captivating image in photography can seem intimidating, but it doesn’t have to be. By using a few easy techniques, you can quickly take your images to the next level and present professional-quality photos that will be sure to impress. Here are a few of my favourite tips and tricks on how to step up your photography game quickly and easily.
1. Angles Are Important
Camera angles and perspective are incredibly important in photo composition.
The two images below are of the same objects, in the same position, with the same lighting. The only thing that has changed is the camera angle. By coming down to the same level of the objects, you fill the frame. This allows your eye to rest on the focal points effortlessly. In the top photo, there is a lot of open space, so the eye isn’t sure of what to look at. This results in the eye focussing on the unsightly scratches on the table rather than the objects.
BEFORE AFTER
AFTER
2. Depth of Field
Using depth of field (DOF) to your advantage is important in telling your eye exactly where to look.
The first image has a lot going on, so your eye is not sure what is important. However, in the second image, using a high DOF (blurry background), your attention is subconsciously drawn to the area of focus. To achieve a high DOF, the aperture on your camera should be wide open (allowing a lot of light to get in), and a long focal-length lens (85mm in this photo) should be used in close proximity to the subject.
BEFORE AFTER
AFTER
3. Editing
Editing is an easy and effective way to take your photos to the next level.
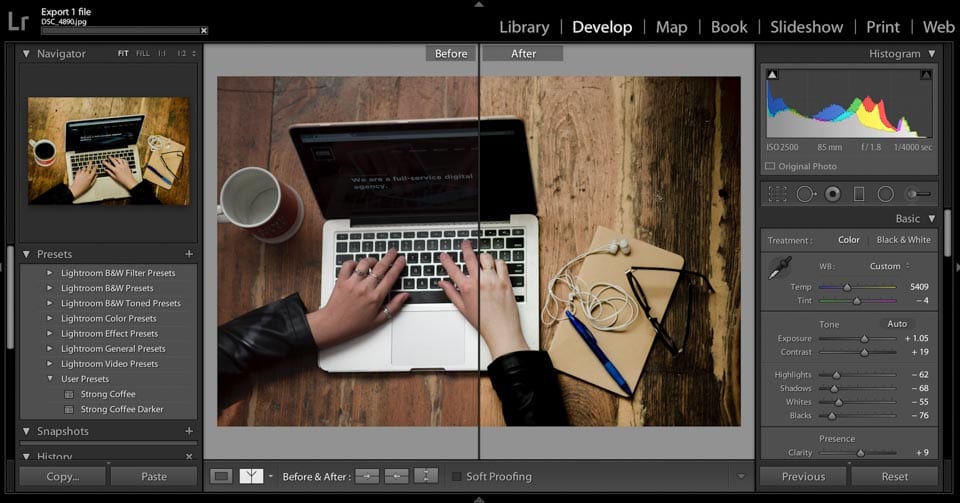
Lightroom is my favourite photo editing tool and can be downloaded from Adobe. In the photo below, Exposure and Contrast were lifted extensively to make the photo bright, without losing depth in the blacks. Highlights and whites were pulled down (reduced) to soften the contrast, while darks and shadow sliders were also pulled down (heightened), to make the blacks in the image deep and rich. Clarity was heightened slightly to show the grain in the wood. To create a cooler colour tone, yellows were reduced in the top slider, and a slight adjustment of green was added to eliminate a blue cast. Finally, the coffee mug was filled (did you notice?!) by using the adjustment brush (tool on the top far right [K]) and turning the exposure level all the way down.
BEFORE AFTER
AFTER INSIDE LIGHTROOM
More Editing Examples:
BEFORE AFTER
AFTER 
BEFORE AFTER
AFTER
4. Photoshop
Lightroom is an incredible program, but it has limitations.
This is where Photoshop comes in. I use Photoshop when I need to go beyond basic colour correction and want to either eliminate or incorporate separate elements to compose a new image. For example, if a flattering portrait was captured, but there was an unsightly telephone pole in the distant background, photoshop is the perfect tool to quickly eliminate this and draw attention to the person in the foreground. Using the opposite technique, multiple elements can be stitched together through Photoshop to compose an image full of attention grabbing content, as seen in the example below. Composition and colour correction was first altered in Lightroom, and the combination of elements was completed in Photoshop.
BEFORE AFTER
AFTER
Of course, there are many more aspects that go into creating a balanced, color corrected, and captivating image in photography. Using these quick and easy techniques will send you well on your way to creating more professional looking images, and skyrocket the wow-factor of your photos.

Recent Posts
Boost Business Efficiency with Google Workspace Automation Tools
Streamlining Your Business with Google-Based Automations Hey there, fellow business owners! If you’re like most of us, you probably feel like there just...
Harnessing Google Tag Manager for Better User Insights and Performance Tracking
Unlocking the Power of Google Tag Manager: Simplifying Tracking and Understanding User Behavior Hey there, fellow business owners! If you’re navigating the digital...
AI Max: Transform Your Google Search Ads Strategy Today
Unleashing the Power of AI with Google Ads’ New AI Max Hey there, fellow business owners! If you’re anything like us at Strong...

 AFTER
AFTER
 AFTER
AFTER
 AFTER
AFTER INSIDE LIGHTROOM
 AFTER
AFTER 
 AFTER
AFTER
 AFTER
AFTER

